Getting Started
Get from zero to an LLM Wiki knowledge base in about 10 minutes.
What You Need
Three things need to be installed before you can use BYOAO:
1. Obsidian (note-taking app)
Download the latest version from obsidian.md and install it. This is where you write notes and browse your knowledge base.
2. Node.js 18+ (JavaScript runtime)
Node.js is a tool that lets you run BYOAO’s installer. It also comes with npm (Node Package Manager), which is the command you’ll use to install BYOAO.
How to install:
- Go to nodejs.org
- Download the LTS (Long Term Support) version — this is the stable, recommended version
- Run the installer and follow the prompts (accept all defaults)
Verify it worked: Open a terminal and run:
node --versionYou should see something like v20.x.x or v22.x.x (any version 18 or higher is fine).
What is a terminal?
- Mac: Open Terminal (press
Cmd+Space, type “Terminal”, press Enter)- Windows: Open PowerShell (press
Win+X, select “Windows PowerShell”)- You only need the terminal for the installation steps below. After setup, everything happens inside Obsidian.
3. OpenCode (AI engine)
OpenCode is the AI tool that powers BYOAO’s skills. Once you have Node.js installed, you can install OpenCode via npm:
npm install -g opencodeOr download it from opencode.ai.
What does
npm install -gmean?npmis the package manager that came with Node.js. The-gflag means “install globally” so the command is available everywhere on your computer, not just in one folder.
Step 1: Install BYOAO
npm install -g @jayjiang/byoaoThen register the plugin and install Obsidian Skills:
byoao installThis does two things:
- Registers BYOAO as an OpenCode plugin
- Installs Obsidian Skills (obsidian-cli, obsidian-markdown, etc.) so AI can interact with your vault
Install from source (for developers)
git clone https://github.com/JayJiangCT/BYOAO.git
cd BYOAO/byoao
npm install && npm run build && npm link
byoao install
Step 2: Create Your Knowledge Base
byoao initThe interactive setup asks:
- Your name — used in AGENTS.md so AI knows whose knowledge base this is
- Knowledge base name — defaults to “{Name}‘s KB” (when adopting an existing folder, the folder name is used)
- Vault location — defaults to
~/Documents/{KB name}(skipped when you adopt a folder withbyoao init --from) - Main use — Personal (learning, hobbies, notes → core LLM Wiki only /
minimal) or Work (team context; optional Jira, Confluence, BigQuery). Personal skips the next preset question. Work may pick a preset automatically, or show Choose your work setup when more than one work-oriented preset is available (for example minimal without team integrations vs PM/TPM) - Domain (optional) — what topic area the knowledge base covers; press Enter to skip
- Connected services? — only if the chosen preset includes MCP servers: select which services to enable (Atlassian, BigQuery). BigQuery will prompt for your GCP Project ID; authentication runs when you first use it
- After the vault is created — Set up AI provider now? (terminal only) — optional; you can run
opencode auth loginlater
Pass --preset on the command line to skip the main use and work setup questions; BYOAO uses that preset directly.
Already have notes?
Adopt an existing folder instead:
byoao init --from ~/Documents/my-notesBYOAO detects your existing files and injects its structure alongside them. If the folder is already an Obsidian vault (.obsidian/ exists), your config is preserved — BYOAO never overwrites your plugins, themes, or hotkeys.
What gets created
For a minimal KB:
{KB Name}/
├── .obsidian/           # Obsidian config + Agent Client plugin
├── entities/            # Agent-compiled: people, orgs, projects
├── concepts/            # Agent-compiled: methods, rules, decisions
├── comparisons/         # Agent-compiled: side-by-side analyses
├── queries/             # Agent-compiled: valuable Q&A
├── SCHEMA.md            # Tag taxonomy and conventions
├── INDEX.base           # Knowledge map (Bases; copied from package template when missing on init)
├── log.md               # Action log
├── AGENTS.md            # AI navigation index
└── Start Here.md        # Your onboarding guide
That’s it — 4 agent directories and a few files. Your existing notes stay exactly where they are.
Step 3: Open in Obsidian
Important: Download the latest version of Obsidian from obsidian.md. BYOAO requires features available in recent versions (Bases, Properties view, CLI).
- Open Obsidian → Manage vaults → Open folder as vault → select your KB path
- When prompted, click “Trust author and enable plugins”
- Read “Start Here.md” for a quick orientation
Configure Obsidian Settings
After opening your vault, go to Settings (gear icon in the bottom-left) and configure the following:
General → Command Line Interface
Scroll down to the Advanced section and enable Command line interface:
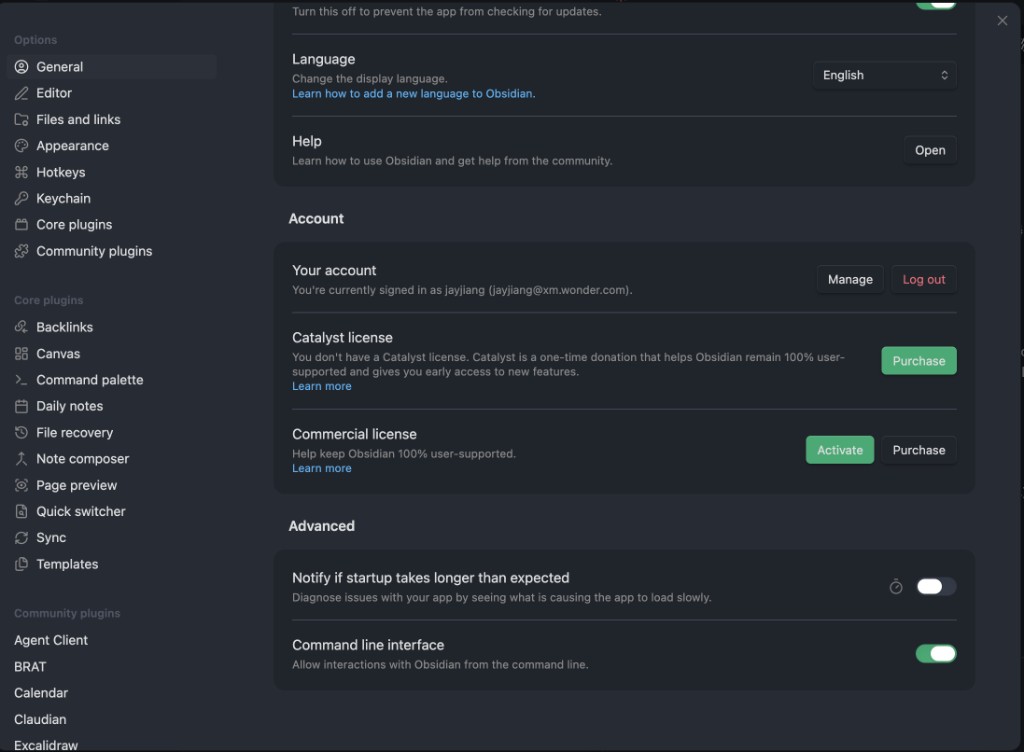
Why enable CLI? BYOAO’s skills use the Obsidian CLI to search, read backlinks, and query the knowledge base. Without it, skills like /cook can’t function.
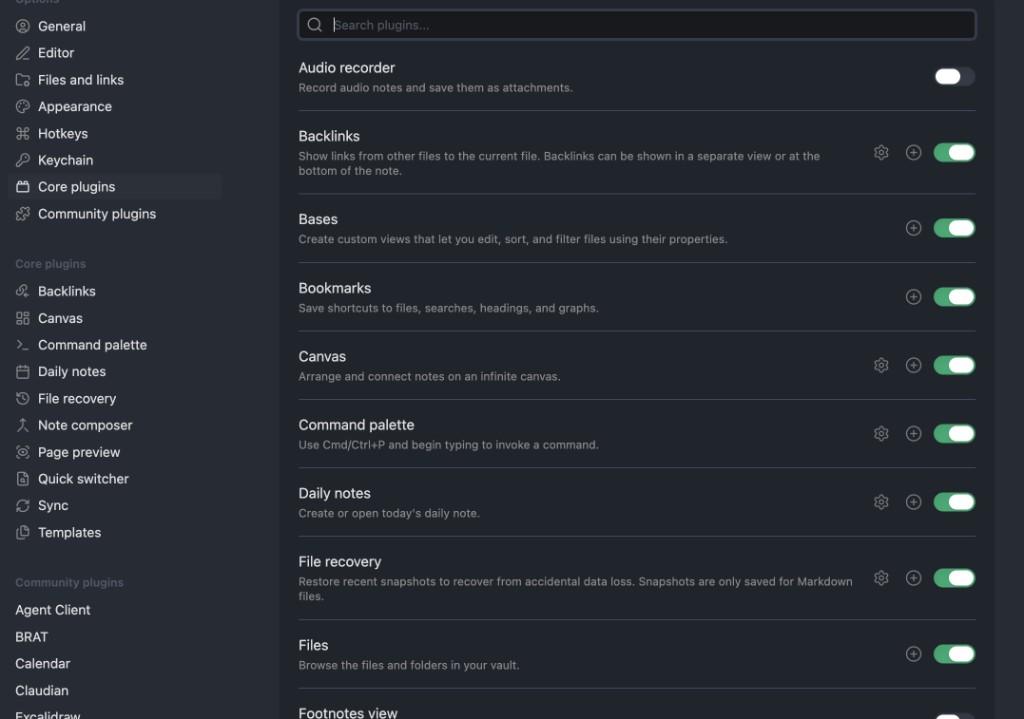
Core Plugins
Go to Core plugins and make sure the following are enabled:
- Backlinks — show links from other files to the current file
- Bases — custom views for editing, sorting, and filtering files by properties (required for
INDEX.base) - Canvas — arrange and connect notes on an infinite canvas
- Command palette — quick command access via
Cmd+P
Also verify that Properties view is enabled (further down the list):
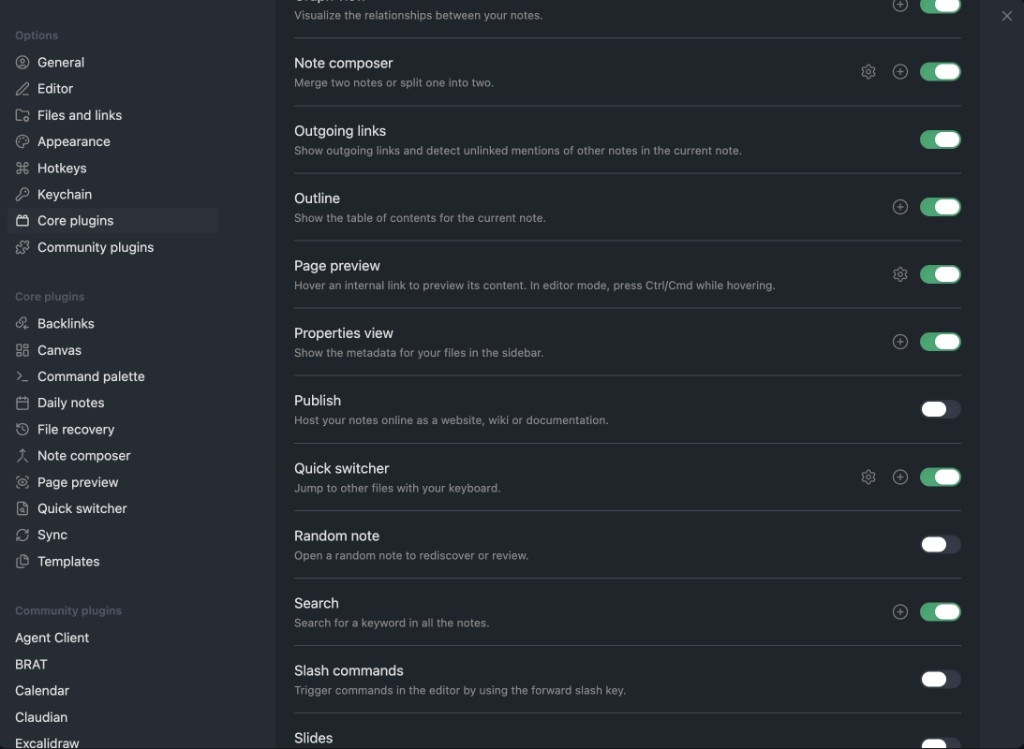
Properties view shows frontmatter metadata in the sidebar, making it easy to inspect and edit type, tags, sources, and other fields on agent pages.
Files and Links → Attachment Settings
Go to Files and links, find the Default location for new attachments dropdown, and select “In the folder specified below”. Then set Attachment folder path to Attachments:
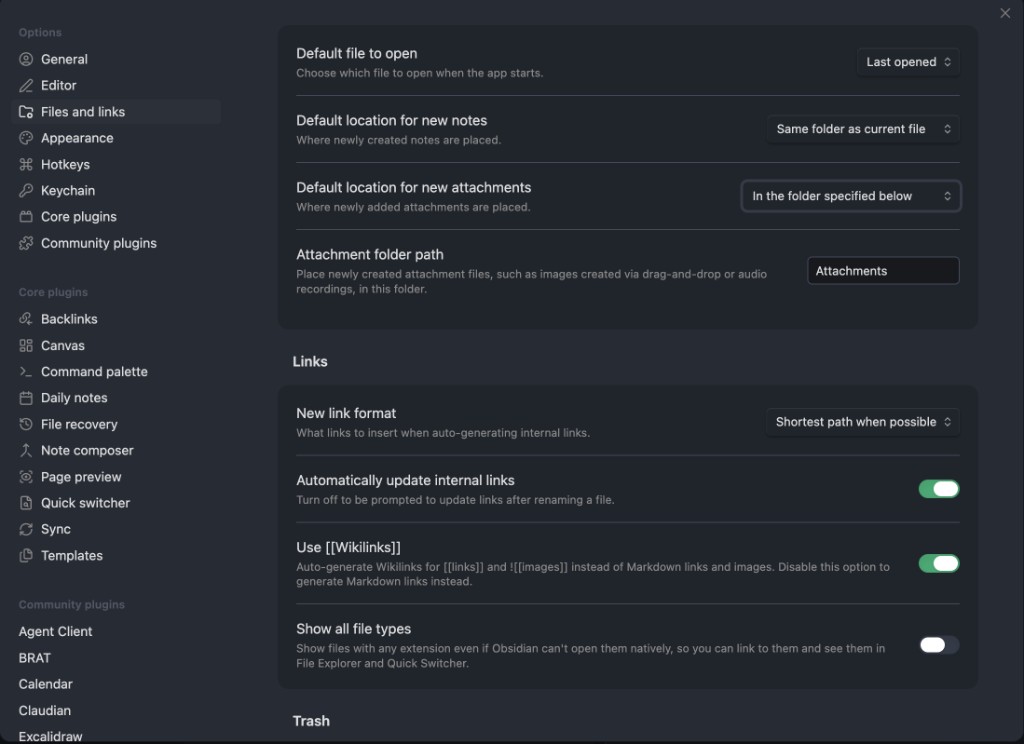
This keeps images and other attachments in a dedicated Attachments/ folder instead of scattering them alongside your notes.
Step 4: Run /cook
Open the Agent Client panel (icon in the right sidebar) and type:
/cook
This is where the magic happens. /cook reads your notes and compiles structured knowledge:
- Creates entity pages for people, projects, and products mentioned across notes
- Creates concept pages for methods, rules, and decisions
- Detects contradictions across your notes and flags them for review
- Updates INDEX.base (knowledge map) and log.md
- Reports a natural-language summary of what changed
After it runs, press Cmd+G to open Graph View and see your notes connected to agent-compiled knowledge pages.
Recommended: Obsidian Web Clipper
Install Obsidian Web Clipper to turn your browser into a knowledge capture tool. Web Clipper saves articles, research papers, recipes, references — anything on the web — directly into your vault as clean Markdown.
Why it matters for BYOAO: Clipped pages become raw material for /cook. The AI reads them alongside your own notes and compiles structured knowledge — entities, concepts, and connections — from everything you’ve captured.
Install
Add the extension for your browser: Chrome | Safari | Firefox | Edge | Arc | Brave
Set Up a BYOAO Clipping Template
Web Clipper supports custom templates that auto-apply frontmatter. Create one for your BYOAO vault:
- Open Web Clipper settings (click the extension icon → gear icon)
- Create a new template with these settings:
| Setting | Value |
|---|---|
| Template name | BYOAO Article |
| Note name | {{title}} |
| Note location | Clippings (or any folder you prefer) |
| Vault | Your BYOAO vault |
- In the template body, use:
---
title: "{{title}}"
date: {{date}}
type: reference
tags:
  - clippings
  - {{#if author}}{{author}}{{/if}}
sources:
  - "{{url}}"
author: "{{author}}"
---

{{content}}
Now when you clip a page, it lands in your vault with proper frontmatter — ready for /cook to process.
Workflow: Clip → Cook → Knowledge
- Browse the web normally. When you find something worth keeping, click the Web Clipper icon
- Optionally highlight key passages before clipping (highlights are preserved)
- The page saves to your vault as a Markdown file in
Clippings/ - On your next
/cookcycle, the AI reads your clippings and extracts entities, concepts, and connections into the knowledge base - The original clipping stays as a source reference — agent pages link back to it
Tip: Set up auto-apply rules in Web Clipper to automatically use different templates for different sites (e.g., one for articles, one for research papers, one for recipes).
What’s Next?
- Core Concepts — understand how BYOAO works under the hood
- Workflows — common scenarios: first cook, weekly review, tracing ideas
- Skills Reference — all AI skills in detail
Next: Core Concepts →